前言
智能指针在多个领域都具备使用价值,例如资源管理与重复代码任务的自动化。
智能指针相对于raw pointer的优点
- 构造、析构
智能指针将完美初始化,并且智能指针的析构会负责对象的释放。 - 拷贝与赋值操作
可以自由地深拷贝,或者指针拷贝,又或者禁止这些行为。 - 解引用
自行决定解引用功能,比如用它来实现lazy-fetching.
智能指针的实现雏形
智能指针从模版中生成,因为要与内置指针一致,所以它们是strong-typed:1
2
3
4
5
6
7
8
9
10
11class SmartPtr {
public:
SmartPtr(T* realPtr = 0);
SmartPtr(const SmartPtr& rhs);
~SmartPtr();
SmartPtr& operator=(const SmartPtr& rhs);
T* operator->() const;//解引用
T& operator*() const; //解引用
private:
T *pointee;
}
如果不允许copy与赋值,那就应该把拷贝构造与operator=设为private。解引用对象的两个操作符设为const,因为解引用并不能改变对象本身。
用户如何使用智能指针
假设存在一个分布式系统(对象一些在本地一些在远程),采用不同的方法分别处理本地对象和远程对象相当麻烦,我们试图让所有东西看起来在一个地方:1
2
3
4
5
6
7
8
9
10
11
12
13
14
15
16
17
18
19
20
21
22
23
24template<class T>
class DBPtr{
public:
DBPtr(T *realPtr = nullptr);
DBPtr(DataBaseID id);//指向DB id对象
};
class Tuple{// 数据库元组类
public:
...
void displayEditDialog();//显示一个图形对话框,允许用户编辑
bool isValid() const;//返回合法性检验
};
template<class T>
class LogEntry {//修改T对象时完成日志登记
public:
LogEntry(const T& objectToBeModified);
~LogEntry();
};
void editTuple(DBPtr<Tuple>& pt){
LogEntry<Tuple> entry(*pt);
do{//重复显示对话框,直到数值合法
pt->displayEditDialog();
} while (pt->isValid() == false);
}
被编辑的元祖既可以位于本地也可以位于远程,在编写程序时我们感受不到他们的区别。Logentry的构造函数负责了启动日志记录,析构函数负责关闭记录。这在含有异常时能让程序更加robust,并且建立对象本身也比调用记录函数要直观。
如我们所见,使用智能指针与使用raw pointer区别不大,在了解了这一特性之后,我们开始编写智能指针。
构造、赋值、析构
一般来说构造较为简单:找到需要指向的对象,令raw pointer指向它,如果没有则将raw pointer指向nullptr或者抛出一个异常。
拷贝、赋值、析构由于对象所有权的问题,所以导致略微复杂。我们默认智能指针被释放时需要析构指向的对象,当然,这里的对象说的是动态分配得到的对象。
以STL中的auto_ptr为例:1
2
3
4
5
6
7
8
9template<class T>
class auto_ptr {
public:
auto_ptr(T *ptr = 0): pointee(ptr) {}
~auto_ptr() { delete pointee; }
...
private:
T *pointee;
};
当auto_ptr被拷贝或被赋值时,会发生什么情况?1
2
3
4auto_ptr<TreeNode> ptn1(new TreeNode);
auto_ptr<TreeNode> ptn2 = ptn1;//拷贝构造
auto_ptr<TreeNode> ptn3;
ptn3 = ptn2;//赋值
如果我们只拷贝内部的raw pointer,则会有两个智能指针指向一个对象,如果两个智能指针依次释放,我们会试图析构一个已经被析构的东西,结果未定义。
另一种方法是new一个新的对象,但这本身带有性能损耗,更何况我们也不知道建立什么对象,万一是派生类而非基类呢。
STL定义:“当auto_ptr被拷贝和赋值时,对象所有权随之传递”:1
2
3
4
5
6
7
8
9
10
11
12
13
14
15
16
17
18
19
20
21
22template<class T>
class auto_ptr{
public:
...
auto_ptr(auto_ptr<T>& rhs);
auto_ptr<T>& operator=(auto_ptr<T>& rhs);
...
};
template<class T>
auto_ptr<T>::auto_ptr(auto_ptr<T>& rhs){
pointee = rhs.pointee;
rhs.pointee = nullptr;
}
template<class T>
auto_ptr<T>& auto_ptr<T>::operator=(auto_ptr<T>& rhs){
if (this == &rhs)//处理自赋值,此处内容建议翻阅Effective C++ 12
return *this;
delete pointee;
pointee = rhs.pointee;
rhs.pointee = nullptr;
return *this;
}
一般来说,拷贝构造和赋值运算符的形参都是const,但是auto_ptr的就不是,原因在于rhs被改变了。
最后,其析构函数如下所示:1
2
3
4
5
6template<class T>
SmartPtr<T>::~SmartPtr(){
if (*this owns *pointee) {
delete pointee;
}
}
不同的智能指针析构函数各有不同,比如说shared_ptr就需要检查引用计数。
解引用操作符
operator*
operator*返回所指向的对象,理论上来说这好像很简单:1
2
3
4
5template<class T>
T& SmartPtr<T>::operator*() const{
perform "smart pointer" processing;
return *pointee;
}
首先,我们必须初始化指针或者让raw pointer合法(例如Lazy evaluation中构建对象)。
其次,我们必须返回引用而非对象,因为在引入继承体系后,如果返回对象会导致slicing,而且智能指针也因此丧失了虚函数的功能,此外返回引用效率也高。
operator->
operator->与operator*差不多,我们先回头看用户使用实例中调用->的语句:1
pt->displayEditDialog();
该语句被编译器解释为:1
(pt.operator->())->displayEditDialog();
这意味着不论operator->返回什么,它必须在返回结果上使用->,那也就是说operator->仅能返回一个指针或类指针对象,一般来说,我们把一个raw pointer作为其返回值。
测试智能指针是否为nullptr
为了保证智能指针的行为与raw pointer完全一致,比如保证下述表达式能够编译:1
2
3
4SmartPtr<TreeNode> ptn;
if (ptn == nullptr)
if (ptn)
if (!ptn)
为了谨慎和保险,我们在智能指针类中重载operator!,当且仅当其为空指针时返回true:1
2
3
4
5
6template<class T>
class SmartPtr {
public:...
bool operator!() const;
...
};
把智能指针转为raw pointer
有时我们需要作出类似的转换,因为有些接口只接受raw pointer,可能你会写出&*sp之类的东西,但这无疑太丑了。所以某些人更倾向于隐式类型转换符:1
operator T*() { return pointee; }
这种设计看起来很好,但实际上完全不行,如果直接可以让用户操纵raw pointer,那我们设计智能指针的意义何在?并且引用计数等功能也遭到了破坏。
此外,这种隐式转换编译器同一时间只能使用一次,比如说智能指针和raw pointer之间存在隐式转换,raw pointer又和A之间存在转换,智能指针无法隐式转为A,也就是说其行为与raw pointer不符。
这种写法还会诱导用户写下delete sp这种天理难容的东西,要知道智能指针是一个对象…
编译器不会报错,但你的对象会被删除两次(一次是delete,一次是sp被析构)
总之,智能指针应该拒绝提供隐式转换操作符,最好的操作就是提供显示接口,例如get。
智能指针与基于继承的类型转换(Effective C++ 46)
下图是模型化音乐商店商品的一个继承体系,其大致实现如下: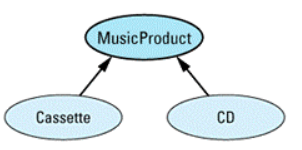
1
2
3
4
5
6
7
8
9
10
11
12
13
14
15
16
17
18
19
20
21class MusicProduct {
public:
MusicProduct(const string& title);
virtual void play() const = 0;
virtual void displayTitle() const = 0;
...
};
class Cassette: public MusicProduct {
public:
Cassette(const string& title);
virtual void play() const;
virtual void displayTitle() const;
...
};
class CD: public MusicProduct {
public:
CD(const string& title);
virtual void play() const;
virtual void displayTitle() const;
...
};
更进一步地假设存在一个函数,它对于任何一个Musicproduct对象都会显示标题并播放指定次数:1
2
3
4
5
6void displayAndPlay(const MusicProduct* pmp, int numTimes){
for (int i = 1; i <= numTimes; ++i) {
pmp->displayTitle();
pmp->play();
}
}
显然该函数本身具备多态性,但如果我们使用智能指针,则无法具备多态性,原因在于sp派生出的这几个class根本不具备任何相关性。
隐式转换
我们想到的第一个解决方案是令每一个sp class具备隐式类型转换符:1
2
3
4
5
6
7
8
9
10
11
12
13
14class SmartPtr<Cassette> {
public:
operator SmartPtr<MusicProduct>(){return SmartPtr<MusicProduct>(pointee);}
...
private:
Cassette *pointee;
};
class SmartPtr<CD> {
public:
operator SmartPtr<MusicProduct>(){return SmartPtr<MusicProduct>(pointee);}
...
private:
CD *pointee;
};
此方法缺点十分明显:
- 对于每一个sp class都需要加入大量的隐式类型转换符,这对template是一大讽刺。
- 如果当前对象位于继承体系的底层,那你必须为每一个直接或者间接继承的基类提供隐式类型转换,因为编译器无法执行多次转换。
非虚成员函数模板
1 | template<class T> |
其具体工作原理如下:
假设编译器持有一个指向T对象的智能指针,它需要把该指针转换成指向T的基类的智能指针.
编译器检查了一番SmartPtr<T>,但并没有找到明确的类型转换符,然后检查有没有一个成员函数模板,通过该模板实例化一个对象完成类型转换。最终它构建了这么一个对象,完成了隐式转换。
结合具体实例而言,1
2
3
4
5void displayAndPlay(const SmartPtr<MusicProduct>& pmp,int howMany);
SmartPtr<Cassette> funMusic(new Cassette("Alapalooza"));
SmartPtr<CD> nightmareMusic(new CD("Disco Hits of the 70s"));
displayAndPlay(funMusic, 10);
displayAndPlay(nightmareMusic, 0);
函数在调用时本质上使用了Smart<music>的构造函数,将新的对象作为参数传递给了函数,最终完成多态。
不要觉得这种方法只能用于继承体系中的相互转换,事实上,这是一种通用的、安全的智能指针转换操作,只要你能够把T*隐式地转为NT*,那我们就一定能安全直接地转换它们的智能指针。假设我们修改了继承体系: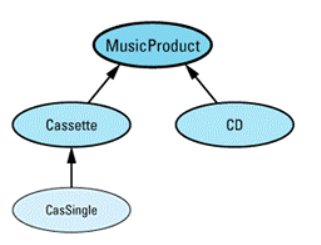
并有如下代码:1
2
3
4
5
6template<class T>
class SmartPtr { ... };
void displayAndPlay(const SmartPtr<MusicProduct>& pmp,int howMany);
void displayAndPlay(const SmartPtr<Cassette>& pc,int howMany);
SmartPtr<CasSingle> dumbMusic(new CasSingle("Achy Breaky Heart"));
displayAndPlay(dumbMusic, 1);//error!
这里错误的原因很简单,二义性,所有类型的转换符具有同等地位,编译器无法知道该使用哪一个(这种行为与内置指针不符,内置指针会直接匹配继承体系最接近的重载)。
智能指针与const
对于raw pointer,我们的const属性分为顶层和底层,详见C++ Primer。
我们希望智能指针也拥有const属性,但实际上好像不太行,我们可以令智能指针自身const,无法让指向的对象也const.有一个简单的补救方法:1
SmartPtr<const Sth>;
但该类型的对象与SmartPtr<Sth>不具备任何相关性,所以需要再次使用上文所提到的成员模板。需要注意的是,const的类型转换是单向的,就像public继承一样,non-const可以做const的事,反之则不行.既然如此,我们不如把它设为继承关系: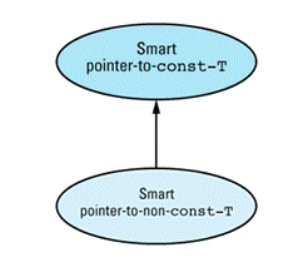
1
2
3
4
5
6
7
8
9
10
11
12template<class T>
class SmartPtrToConst {
protected:
union {
const T* constPointee;
T* pointee;
};
};
template<class T>
class SmartPtr:public SmartPtrToConst<T> {
...//没有数据成员
};
使用这种设计方法,指向non-const-T对象的智能指针包含一个指向const-T的raw pointer。union的特点是节约空间,但我们需要手动约束两个类各自使用专属指针。其使用大致如下:1
2SmartPtr<CD> pCD = new CD("Famous Movie Themes");
SmartPtrToConst<CD> pConstCD = pCD;